Revit MEP for Beginners: Exploring the Interface
Begin your Revit MEP journey by mastering the interface. This guide covers the ribbon, project browser, properties palette, and view controls for beginners

Revit MEP for Beginners: Exploring the Interface
Introduction to Revit MEP
Revit MEP, a specialized module of Autodesk Revit, is a cornerstone for mechanical, electrical, and plumbing (MEP) engineers in the architecture, engineering, and construction (AEC) industry. It facilitates the design, modeling, and documentation of building systems within a comprehensive building information model (BIM). By integrating MEP systems with architectural and structural elements, Revit MEP streamlines coordination and enhances project efficiency (Autodesk Revit MEP). For beginners, the key to unlocking its potential lies in mastering the user interface. This guide offers a clear, concise, and compelling overview of the Revit MEP interface, focusing on the ribbon, project browser, properties palette, and view controls to help you navigate with confidence.
Overview of the Revit Interface
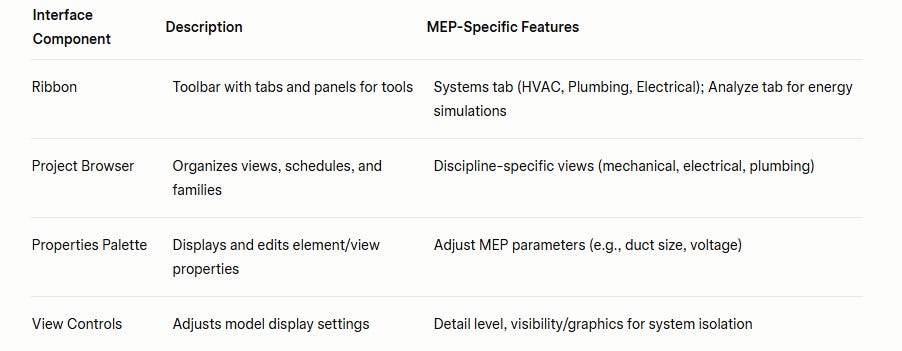
The Revit interface is designed to be user-friendly, with a logical organization of tools and features. While the interface is consistent across Revit’s disciplines—architecture, structure, and MEP—specific tools cater to MEP workflows. The primary components include:
Ribbon: A toolbar at the top, housing tabs and panels with tools for modeling and analysis.
Project Browser: A navigation panel for accessing project views, schedules, and families.
Properties Palette: A dynamic panel for viewing and editing element or view properties.
View Controls: Tools at the bottom of the drawing area for adjusting model display settings.
These elements work together to provide a seamless experience, allowing MEP engineers to design, analyze, and document systems efficiently (Understand Revit's user interface).
The Ribbon in Revit MEP
The ribbon, located at the top of the Revit window, is the central hub for accessing tools and commands. It is organized into tabs, each containing panels of related tools. For MEP users, the Systems and Analyze tabs are particularly critical, though other tabs like Annotate, View, and Manage are also frequently used.
Systems Tab
The Systems tab is the heart of MEP modeling, offering tools for creating HVAC, plumbing, and electrical systems. It includes panels such as:
HVAC: Tools for placing ducts, air terminals, duct fittings, and mechanical equipment like fan coil units.
Plumbing & Piping: Commands for pipes, pipe fittings, plumbing fixtures, and sprinklers.
Electrical: Tools for wiring, cable trays, conduits, electrical equipment, and lighting fixtures.
Fabrication: Supports fabrication parts and multi-point routing for detailed coordination.
Component: Allows placement of components with unspecified categories (Revit MEP User Interface).
For example, to model a duct system, you would select the “Duct” tool from the HVAC panel, define its parameters, and draw it in the workspace. The ribbon’s contextual tabs also appear when specific elements are selected, providing additional modification options.
Analyze Tab
The Analyze tab is essential for MEP engineers performing energy analysis and simulations. It includes tools for:
Modifying energy analysis settings, such as space and material thermal properties.
Running energy simulations via Autodesk Insight®, which may require a subscription.
Viewing analysis results in a viewer with features like rotation, panning, and section analysis.
This tab helps optimize system performance and sustainability, a key aspect of modern MEP design.
Other Relevant Tabs
Annotate: For adding text, tags, and dimensions to document MEP systems.
View: For managing view settings, creating views, and applying templates.
Manage: For project settings, including MEP parameters and schedules.
The ribbon’s customizable nature allows you to tailor it to your workflow, enhancing efficiency (Understand Revit's user interface).
The Project Browser
The project browser, typically located on the left side of the Revit window, acts as a table of contents for your project. It organizes all project elements, including views (floor plans, ceiling plans, sections, 3D views), schedules, sheets, families, and groups. In MEP projects, the project browser is crucial for navigating views tailored to specific systems, such as mechanical, electrical, or plumbing plans.
Navigating the Project Browser
To open a view, double-click its name in the project browser. For example, selecting “Level 1 - Mechanical” opens a floor plan showing HVAC systems. Right-clicking a view provides options like duplicating it or applying a view template to control visibility settings. MEP views often use filters or templates to display only relevant systems, reducing visual clutter.
Organizing MEP Views
MEP projects may include specialized views, such as:
Mechanical Plans: Showing ductwork and equipment.
Electrical Plans: Displaying lighting and power layouts.
Plumbing Plans: Illustrating piping and fixtures.
You can create custom organization schemes in the project browser, grouping views by discipline or system type, which is particularly useful in complex projects (Autodesk Revit MEP).
The Properties Palette
The properties palette, usually docked to the left of the drawing area, is a dynamic tool for viewing and editing properties. It updates based on the selected element or the active view, making it indispensable for MEP workflows.
Editing Element Properties
When you select an MEP element, such as a duct or electrical panel, the properties palette displays its parameters. For instance:
Duct: Adjust size, shape, system type, or flow rate.
Lighting Fixture: Modify voltage, wattage, or photometric properties.
Pipe: Change diameter, material, or insulation.
To edit, select the element in the drawing area, then modify the desired parameters in the palette. This allows precise control over system components.
Adjusting View Properties
When no element is selected, the properties palette shows the properties of the current view. You can adjust settings like:
View Range: Critical for MEP plans to ensure elements like ducts or pipes are visible.
Scale: To control the level of detail in drawings.
Visibility/Graphics: To toggle the visibility of categories or apply filters.
The properties palette’s flexibility makes it a core tool for refining MEP models and documentation (Understand Revit's user interface).
View Controls
View controls, located at the bottomme bottom of the drawing area, provide quick access to settings that adjust how the model is displayed. For MEP users, these controls are vital for creating clear and accurate representations of complex systems.
Key View Control Features
Detail Level: Options include Coarse, Medium, and Fine. Coarse displays simplified representations (e.g., ducts as single lines), while Fine shows detailed geometry (e.g., 3D ducts). MEP users often use Coarse for early design and Fine for detailed coordination.
Visual Style: Options like Hidden Line, Shaded, or Wireframe affect model rendering. Hidden Line is common for MEP to clearly show system layouts.
Visibility/Graphics Overrides: Allows control over which element categories (e.g., ducts, pipes, electrical equipment) are visible and their appearance (line weight, color, fill pattern). This is crucial for isolating specificme show only specific MEP systems in MEP views.
Graphic Display Options: Includes settings for shadows, depth cueing, and lighting, though these are less critical for MEP than for architectural visualization.
Using visibility/graphics overrides, MEP engineers can create discipline-specific views, such as showing only electrical systems in a plan, enhancing clarity (Revit MEP User Interface).
MEP-Specific Features
Revit MEP offers specialized features that enhance interface functionality:
Analytical Duct and Pipe Segments: These sub-elements allow visualization and analysis of data like pressure drop and flow, accessible in the interface for tagging and scheduling.
Embedded Schedules: Create schedules for MEP systems (e.g., duct, piping, electrical) to itemize and display model data, streamlining documentation.
New MEP Parameters: Added to data panels and fabrication ductwork, these parameters enhance workflow capabilities, such as reporting power loads from low voltage panels.
These features, accessible through the ribbon and properties palette, support detailed analysis and documentation, critical for MEP engineering (Autodesk Revit MEP).
Tips for Beginners
Explore Tooltips: Hover over tools in the ribbon to view descriptions, helping you learn their functions.
Practice with Sample Projects: Use Revit’s sample MEP projects to experiment with the interface without affecting real work.
Take a Revit MEP Course: Enroll in a Revit MEP course to deepen your understanding, as mastering the interface is a foundational skill for any Revit training.
Customize the Interface: Adjust the ribbon or project browser layout to suit your workflow, accessible via the Options dialog (Understand Revit's user interface).
Conclusion
Mastering the Revit MEP interface is a critical step for beginners aiming to excel in MEP engineering. By understanding the ribbon, project browser, properties palette, and view controls, you can navigate the software efficiently, focus on designing sustainable systems, and produce accurate documentation. Whether you’re self-learning or enrolled in a Revit MEP training program, a solid grasp of the interface will boost your career and unlock your potential in BIM workflows. Practice regularly, explore online resources, and consider local Revit courses near you to accelerate your learning journey.